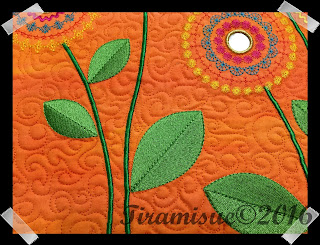
Inspired by dandelion flowers, this is a new Shisha design I have just finished. Use with 25mm mirrors or sequins or the centre can be completed by applique. Designs are available in two sizes - either as single designs for the 4x4inch (100 x 100mm) hoop and stitch the stems with your sewing machine or if you have a jumbo hoop, you get the single designs and also a file for the 14x14inch (360x360mm) hoop or two files - split design for the 14x8 inch (200x360mm) hoop.
Available in my Etsy Shop for $3.00 Australian! Click on the side bar for more info.
Sue xxx
Sunday, February 28, 2016
Thursday, February 25, 2016
Ascending Hawk
The hawk is from Urban Threads. It is stitched in three parts and is about 60cm in width. Quite the challenge to get it all together. I removed their registration marks as my machine didnt want to recognise them. I added my own cross marks for lining up. I have made up a set of Shisha Mirror designs that will go in to the shop later. The fabric is all painted. The hawk was stitched, and then painted gold with a couple of other colours added to try and 'age' him a little. There are a few layers of batting within the hawk to make him stand out. I do like a bit of trapunto.
Close ups - I quilted the fabric which was painted purple - my 'go to' colour - and then lightly sponged some gold on - it really brings out the design.
In the painting department, I have also been messing about with the good ole Jo Sonya and other acrylic paints in my hording cupboard. The fabric has coloured up nicely and is still quite soft after washing.
Not in love with this colour way, but I can always throw more paint on it!
This one was simply twisted into a roll and then wound up and pain was thrown about. It has a really nice subtle design. It looks like rushing water.
This piece was the clean up piece. I used it to wipe out all the excess paint from the plastic cups being used. It almost looks marbled. I did a quick gold stencil over it.
Bought some cheap shaving foam from the stupid market, so will see how that goes for marbling this afternoon!
Sue xxx
Thursday, February 11, 2016
GRAFFITI QUILTING - KINDA SORTA!
This weeks efforts include having a go at a 'splatter' technique of flinging fabric paint all about. This piece of previously white homespun was treated with watered down fabric paint and some isoprophyl alcohol - find it in Bunnings in the paint clean up section - also known as rubbing alcohol. A few drops of watery black paint was then added. The birds are from Urban Threads - with 50,000 + stitches in each one. The quilting took quite a few hours (over 9). As a lot of it is double and treble times over I would guess at least 300,000 stitches. Just need to decide what to do with it now. I also have a piece with Ravens in the same style waiting for quilty inspiration. If you haven't heard of Graffiti Quilting, look up Karlee Porters work. She is my quilting idol at the minute!
I haven't put a backing on this - it may be a cushion or a bag panel - sometimes when you are trying new styles of quilting I recommend doing this - you concentrate on the front then and don't worry about what is happening on the back. This one wasn't too bad.
The birds have been given an extra layer of batting to make them puff out - trapunto style. I do mine like this.
Cut pieces of wadding/batting the just a little larger than the area you want to make look "fuller".
I use this glue for everything. I get it from Embroidery Source in Melbourne. I dont was time with quilt basting spray which I find is often ineffective. Before you start stitching, make sure it is dry and then your needle wont get gummed up.
Stitch from the front - follow the outline closely.
The front - I stitched as close as I could. Any odd bits will be covered by the stitching. You may also prefer to use invisible thread like Mono Poly or Madeira Poly.
Now the fun part (and yes that is with sarcasm) is to carefully cut around the outline. Dont get to stressed on the hard to reach places. Quilting will take care of these bits.
You may also wish to use a dissolving thread in the bobbin, if you want to keep your outlines clean.
Now place a full piece of batting/wadding over the back of your work and start stitching!
Sue xxx
Subscribe to:
Posts (Atom)


