


Take a cane basket, some fabric, glue and padding, and hey presto, a very snazzy sewing box. Lots of photo's show the process of putting this together. You may not be able to find an exact match for this particular basket, but I have included as many tips as possible, to enable you to transform any basket or box that takes your fancy!

These "spaces" measured at 2 1/2 inches so I cut the strips of fabric into strips 3 1/2 inches wide. These strips were then sewn with a 1/4 inch seam. The seam are pressed open. I have a set of "Tube Turners" that I purchased at a craft show a long time ago, and they have been a great investment over the years.


Next the basket needed some padding. I padded the basket itself with one layer of wadding/batting - take the inside measurement and cut to size - the padding should just fit the basket without any overlap - this will stop any thick bits (technical term). Use a good tacky craft glue - it makes this type of work so much easier.
Now to make the liner. I found a lovely shot taffeta type fabric that perfectly matched the purple in the butterfly fabric. Measure the depth of the inside of the basket. Add an 1 1/2 inches or more - you can always trim, but it is impossible to add (well it isn't impossible, you will just have to get creative). I kept the lining simple with no gathers, because I would be adding pockets. Measure the inside top rim of the basket and add a generous seam allowance. Cut another piece of wadding/padding. On the lining fabric, turn a seam allowance on the top edge and press to the back - make this fold a generous 1/2 inch . Place the wadding onto the lining fabric, level with the fold line. If you have a glue stick handy - dab some glue on the 1/2 inch fold - this will keep your edge neat whilst you sew. Feel free to press the glue dry - It is on the back so not visible.

Top Stitch close to the edge.

Next, set your sewing machine as follows - straight stitch - stitch length of 4 drop tension down a couple of full notches from its normal sewing setting (eg. If normal stitching tension is 4, set the machine to 2). Stitch the lining fabric into a tube and test that it is a perfect fit. Too small, simply pull the bottom thread and the stitching should pull out quickly and easily. Move the seam over a little and sew again. Test the fit again, when it is right, you can now take the opportunity to measure up for the pocket piece. Decide how deep you need to make the pockets. Remember you have to be able to reach to the bottom, for small items. Place a pin where the top of the pocket will be. When you are happy with the fit - no gaps - reset the machine to its normal stitching. Mark the stitching line and remove stitching. You now need to add the pocket!

Cut a piece of the lining fabric (or use a contrast) twice the depth of the pocket plus a little to take the pocket under the base for a neat finish. This piece will need to be the same width as the lining you have just prepared.
Fold in half length ways and press. If the design is a one way design, make sure you lay the pocket piece on to the lining the right way up! The open edges should be at the bottom. Lay the liner out flat and using a tape measure or ruler, carefully pin the pocket piece into position. Check it is straight!!

Stitch to the liner at the bottom edge. You will possibly need to run another line of stitching, when it comes to the final fit. Now you need to place dividers into place. The fabric I used was very hard to mark, so I used tape instead. You can either sew through the tape, or just use it as a guideline.


As you can see in the picture, I used my quilting ruler to make sure the pocket mark was straight by lining up the ruler with the edge of the pocket and then I placed the tape next to the rulers edge. I used painters tape for demonstration purposes (it is easier to see on this fabric), but any sticky tape or low tack tape will do - "whatever is to hand" I say! Make sure you put the machine back to "normal" sewing and stitch the dividers. Remember the edges - these will make their own pockets when the side seam is sewn up.
As an afterthought, I added a row of decorative stitching just above the pocket. I often do this on the internal pockets of tote bags, but actually stitch on the pocket before its final placement and use a contrasting thread. If the lining is dark, it makes the pocket easier to see.


Now sew the side seam. To keep everything flat, trim back the wadding after the seam has been sewn.


Test the fit again before gluing. Check the bottom row of stitching, is this level with the bottom of the basket or will it go under the base. If it goes under the base line, run another row of stitching, because if you put anything in the pockets that can work its way under the base, you can bet that it will.

When you are happy with the fit, glue to the edge of the basket. I used pins to keep everything in place until the glue dried. Don't glue the bottom just yet.


Continue gluing opposite tabs, until all have been glued into position. To achieve the padded look, you will need to pierce two holes into the cardboard. I used a covered button as my centre piece. I also used a flat button on the back to tie off with. Thread a needle - I cut a long piece of thread and folded twice so I now had 4 threads. You are now going to thread up through the backing button, leaving a tail, then through one of the holes in the cardboard, then through the decorative button, back through the second hole (and all the layers) and then back through the flat button. You should have nice long tails to tie off with. Put a generous dob of glue on the cardboard and then tie off over the flat button. Slap another dob of glue on the knot and there is not a chance that it will come undo!!

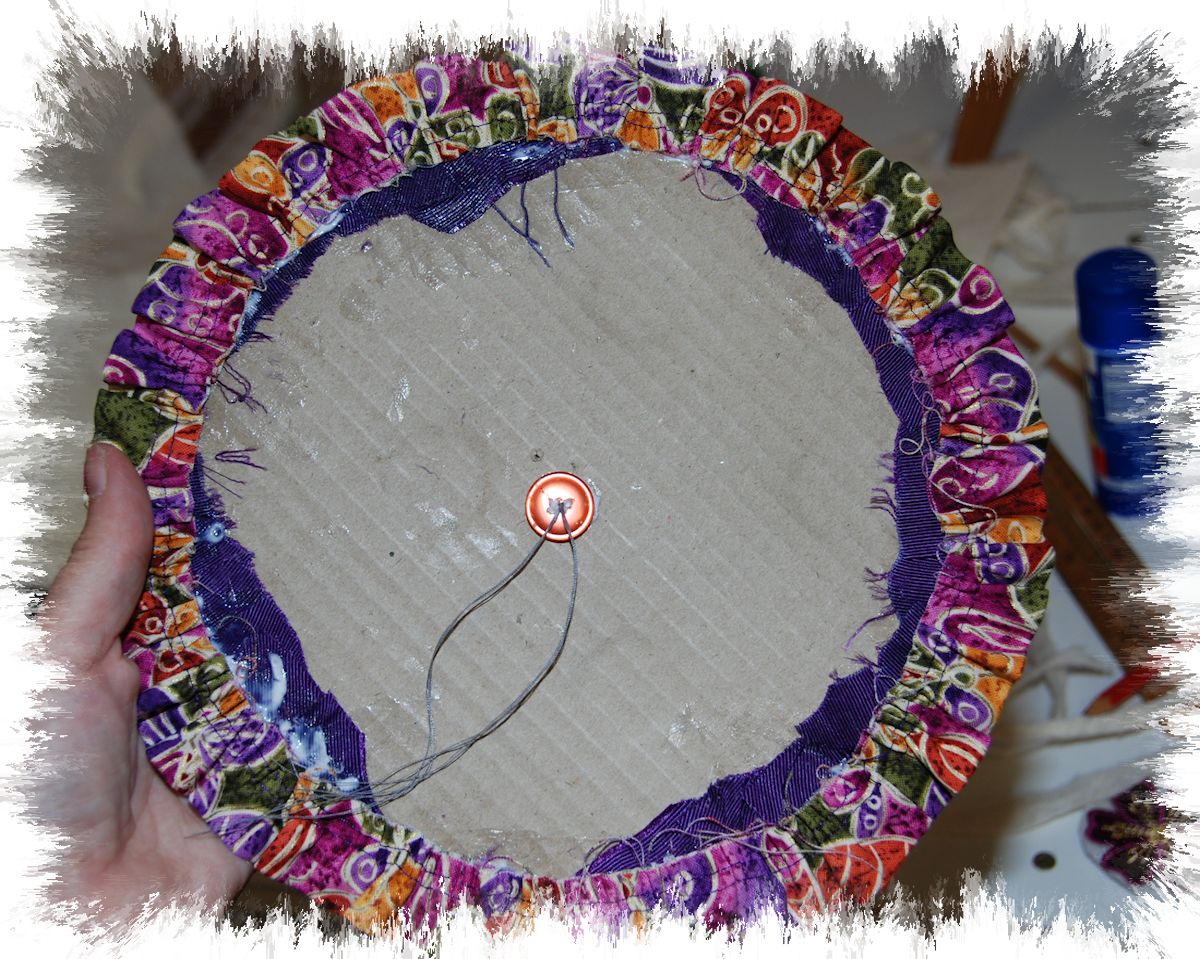

If you wish to add a frill as further decoration, cut a piece of fabric, twice the length of the outside edge of the circle by twice the width of the proposed frill. I cut my piece of fabric the width of the fabric x 2 inches and the stitched the two short ends together. Press in half - you now have a tube of fabric 1 inch wide by the chosen width. Set your sewing machine up as follows - Straight stitch - stitch length 4, stitch tension - at least 2 full notches below normal sewing position. (eg if the machine is normally set at tension 4, go down to 2 or lower). Sew two rows of stitching, taking care that you keep the tails of thread out of the way as you start each row. DO NOT BACK STITCH OR TIE OFF! Sew the rows with a space of at least 1/2 an inch. Gently pull on the bottom thread and start your gathers. Ease up the gathers until you reach the desired size. Tie off the ends and distribute the gathers evenly. Glue to the back of the cardboard circle evenly around the edge. Have as little or as much showing as you like. When the glue is dry enough that it won't end up on the basket lining, you are ready to test the fit. Do this when the glue on the liner is firmly set (overnight).
Check the length of the liner, does it need any trimmed off the bottom edge - too much fabric in the base won't sit well. The liner really only needs to fit into the base of the basket by about 1/2 to 3/4 of an inch. Make sure the sides are straight and then glue the bottom of the liner onto the bottom of the basket.

Place some glue on top of the fabric as shown in the photo and then gently slide the base into position. I put a weight on top to make sure it all stuck evenly.


You may not want to have a lid on this basket, but if you do, here is how I did mine.


For the top of the lid, I drew around the place mat, adding an extra 2 inches all around.


Cover the place mat with Modpodge or other suitable glue and centre of the fabric circle. Use just enough to glue these two together, so that the glue doesn't come through to the front of the fabric. Turn the piece over and make sure it is smooth with no air bubbles. Turn over again and clip around the circle, not quite up to the edge of the place mat.

Glue the tabs into position.

I then applied modpodge over the fabric right up to but not over the edge. Let this dry. If you get a good finish you may wish to apply a couple more coats of modpodge.

Next I made the under lid which I wanted to be a pin cushion.

Put the screw into position. You cannot add this at the end. Cover the lid with wadding, as you did the base. Make it as padded as you like. Cover with fabric as you did the base.

Make sure the edges are as smooth as possible and when you are happy with the finish, apply a generous amount of glue to the back of the inner lid and push the two layers together, by screwing the handle into place. If you have a couple of clamps handy, clamp away, otherwise place on a flat surface and stand a couple of weights on top until dry. I also added some glue to the top of the screw, so the handle didn't come undone.

I added a frill to the underside of the lid....


As you can see in the photo's I added another frill and a couple of butterflies to finish - the final look is up to you. AND IF ALL ELSE FAILS, this one will be for sale in my Etsy Shop.
To finish, here is O'Reilly - kinda like - "Oh my grandma, what a big tongue you have" said Little Red Riding Hood. "All the better to taste you with" said the wolf (well that is in my version)....

Sue xxx


 Quilter Blogs & Store Search
Wow this is a great tutorial. Wonderful work!
ReplyDelete